

Carrying a firearm safely starts with choosing and maintaining the right holster. A secure holster protects the trigger, retains the firearm during movement, and allows safe, quick access. Here’s what you need to know:
- Trigger Protection: Ensure the holster fully covers the trigger guard to prevent accidental discharges.
- Retention: Test the holster’s grip on your firearm during daily activities to confirm it stays secure.
- Gun Belt: Use a sturdy, purpose-built gun belt to support your holster and firearm.
- Daily Checks: Inspect for wear, clean regularly, and confirm all components are functioning properly.
- Practice: Train with an unloaded firearm to master safe drawing and re-holstering techniques.
Key takeaway: Regular maintenance and safe practices are essential to concealed carry safety. Always prioritize a holster that fits your firearm, protects the trigger, and stays secure during movement.
Holster Fit and Retention Basics
Matching Holster to Your Firearm
Choosing a holster designed for your specific firearm model is crucial for safe concealed carry. The holster should fit snugly to ensure secure retention while allowing for a smooth draw. Some holsters use friction for gradual resistance, while others, like interference fit models, may produce a slight "click" when the firearm is seated. However, retention depends on several design elements, so it's important to test this thoroughly.
Testing Retention Strength
After confirming the fit, test the holster's retention through practical use. Wear the holster with an unloaded firearm and perform various activities. Begin with simple movements like walking and sitting, then move on to more active motions. Ensure the holster stays securely attached to your belt and allows for a quick, smooth draw during practice.
Complete Trigger Protection
Covering the trigger guard is non-negotiable for safe concealed carry. The holster must completely enclose the trigger area to prevent accidental contact or movement.
"With modern firearms, this means that the trigger and the entire trigger guard area must be completely covered." - Kathy Jackson
When evaluating trigger protection, check these key points:
- The trigger is fully enclosed with no exposure.
- The material covering the trigger guard remains firm and does not bend.
- Retention features stay effective during movement.
- The draw stroke remains smooth and unobstructed, maintaining complete trigger coverage.
Body Attachment Methods
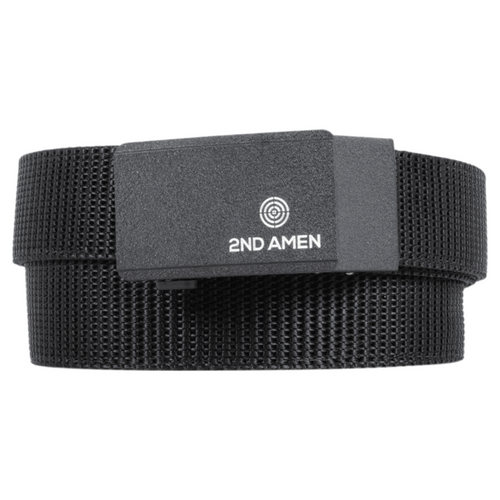
Gun Belt Selection
Choosing the right gun belt is key to safe and effective concealed carry. Unlike a regular belt, a proper gun belt is built to handle the weight of your firearm, distributing it evenly across your waist. Look for these features in a gun belt:
- Dual-layer construction with double stitching for durability
- 1.5-inch width for most uses (opt for 1.25-inch for formal wear or slimmer clothing)
- Internal stiffener made of materials like Nylon 6/6 or Kydex for added support
- High-quality buckles and fasteners that can withstand daily use
Once you’ve chosen the right belt, pair it with a holster that uses a strong and reliable clip system.
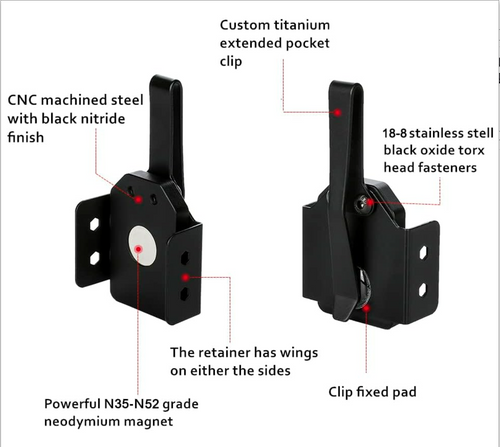
Clip and Mount Security
After selecting your belt, ensure your holster clips are securely attached. Check the following:
- Clip tension is consistent and holds firmly
- Attachment points show no signs of wear or damage
- Clips fully engage with the surface of the belt
- Mounting hardware is tight and secure
As Concealed Carry Inc. emphasizes:
"You need clips that will keep your holster attached to your body when you draw."
Movement Prevention
Test your setup by performing everyday movements to ensure the holster stays stable:
- Walk briskly
- Sit and stand repeatedly
- Bend to pick up objects
- Reach overhead
- Get in and out of a vehicle
If you notice any shifting, it may be a sign that your belt lacks the necessary stiffness. Ted Demosthenes highlights the importance of this:
"IMHO, the most important benefit that a belt of proper stiffness provides is firmly holding the holster in place (vertically) during the draw stroke."
For the best stability and fit, consider using a ratcheting belt system. These offer precise quarter-inch adjustments, ensuring a snug and secure hold.
How To Select A SAFE Holster
sbb-itb-7fb5bb8
Draw and Re-Holster Safety
Ensuring safety during both drawing and re-holstering is just as important as having a holster that fits properly and provides secure retention.
Draw Technique Basics
Start your draw by gripping your holstered firearm firmly. Keep your trigger finger straight and resting alongside the frame - never on the trigger. If clothing is in the way, use your thumb to sweep it aside as you draw. Practice this motion deliberately to build muscle memory and maintain control.
Safe Re-Holstering Steps
"The first rule when holstering a handgun is to not be in a hurry. It might be imperative that you get your gun out fast, but it is never critical to holster it with the same speed."
When re-holstering, take your time and follow these steps:
- Check your holster to ensure the opening is clear of any obstructions.
- Keep the firearm close to your chest as you prepare to re-holster.
- If your firearm has a manual safety or decocker, engage it before holstering.
- Double-check that no clothing or other items are blocking the holster.
- Slowly guide the firearm into the holster without applying unnecessary force.
"After finishing the shooting sequence, you need to pause and shift your entire mental capacity to the task of reholstering the gun."
Trigger Finger Position
Your trigger finger should stay straight, resting against the frame of the firearm, and positioned well above the trigger guard. Many experienced shooters align their finger parallel to the barrel to avoid accidental contact with the trigger.
"The phrase that gets used a lot is to 'look the gun back into the holster.' In other words, actually, look at what you're doing when reholstering the gun."
Daily Safety Checks
Regularly inspecting your holster is crucial for maintaining safety. These daily checks work alongside your routine assessments of holster fit and retention.
Signs of Wear and Damage
Look for any signs of wear or damage, including:
- Stitching: Check for fraying or breaks, especially at stress points.
- Material: Look for cracks, tears, or other damage to the holster's structure.
- Retention Components: Ensure snap closures and tension screws are functioning securely.
- Mounting Points: Verify that clip attachments and belt loops are properly aligned and intact.
Pay close attention to contact points with your firearm, as wear in these areas might indicate alignment issues.
Testing the Retention System
Once you've completed a visual inspection, test the retention system:
- Unload the Firearm: Double-check that the firearm is completely unloaded.
- Stabilize the Holster: Place the holster against a stable surface.
- Test Retention: Rotate the holster to ensure the primary retention mechanism is working properly.
- Check Tension: Confirm that adjustment screws are holding the correct tension.
Keeping Your Holster Clean
Daily cleaning helps prevent debris buildup and ensures your holster stays in top condition:
- Daily Wipe-Down: Remove lint and dust from the surface.
- Weekly Deep Cleaning: Follow the manufacturer's instructions for a more thorough cleaning.
- Hardware Check: Inspect and tighten all screws and components daily.
- Moisture Control: Check for dampness and address it immediately to avoid damage.
Clear any debris from the holster mouth and trigger guard area. For leather holsters, avoid using harsh chemicals that could cause damage. If you’re cleaning a synthetic holster, use cleaning solutions specifically designed for that material.
Concealment and Clothing
Clear Draw Path
Pick clothing that hides your firearm while still allowing a quick draw. Go for garments that provide a smooth, unobstructed path for access. Dark-colored, striped, or patterned cover garments can help disguise any visible outlines. Adding a bright-colored t-shirt under a more neutral outer layer can also divert attention away from your concealed firearm.
Preventing Visible Outlines
Good concealment means avoiding "printing", which is when the firearm’s outline shows through your clothing. Here are some tips to minimize this:
- Loose clothing, like hoodies, works well for appendix carry.
- Shirts with partially hidden designs can make outlines less noticeable.
- Anti-print shields help smooth out the high points of larger firearms.
Adjust your clothing and holster position to reduce printing while staying comfortable.
Position Adjustments
Your carry position should align with your body’s natural shape. As PHLster Holsters puts it:
"All bodies are different, and there's no shortcut for doing the self-assessment steps for yourself".
To fine-tune your position:
1. Find Your Comfort Boundaries
Experiment with ride height and centering. If it feels uncomfortable, try these adjustments:
- Raise the firearm slightly, using a wedge if needed.
- Adjust the cant to align the grip closer to your body for better concealment.
2. Fix Common Problems
Check for issues like carrying too low, improper ride height, or poor centering, which can cause discomfort or imbalance.
3. Make Practical Adjustments
Ensure the firearm sits flat against your body, move it closer to your centerline, and pick a position with minimal movement.
A comfortable setup reduces the need for constant adjustments, helping maintain proper concealment and supporting safe draw practices.
Safety Checklist Summary
This checklist highlights the key safety checks you should perform regularly to ensure your concealed carry holster remains reliable and secure.
Holster Integrity Check
Examine your holster daily for wear or damage, including cracks, stretching, or deformation. Pay special attention to:
- Trigger guard coverage: Ensure it fully protects the trigger.
- Retention system: Confirm it functions properly.
- Clip and mounting hardware: Check for secure attachment.
- Material condition: Inspect areas under pressure for signs of wear.
Retention Testing
Test your holster's ability to retain your firearm using an unloaded weapon in a controlled environment. The holster should:
- Hold the firearm securely, even when turned upside down.
- Provide consistent tension during movement.
- Allow a smooth, controlled draw.
- Keep the firearm stable while you move.
Secure Mounting
Make sure your holster stays firmly attached during daily use by testing the mounting system:
- Check the clip’s grip on your belt.
- Tighten all screws and hardware.
- Confirm the holster stays in place during movement.
Critical Safety Points
Follow these key safety practices:
- Keep your trigger finger away from the trigger guard, ensuring nothing obstructs it.
- Inspect the trigger guard for any damage before each use.
- Avoid modifying the holster’s original design.
A well-maintained holster is crucial for safe concealed carry. Regularly inspect and test your holster to avoid potential safety hazards. If you notice wear, damage, or retention issues, address them immediately to ensure your safety.